
Practice your knitting with a gorgeous winter sweater

Create this adorable set for the winter explorer in your life!
In this week's blog post, practice your knitting with a free project!
As always, we would love to see your work! If you make this project, tag us on social media with #leisurearts.
-Leisure Arts Team
ABBREVIATIONS
ch(s) | chain(s) | P | purl |
K | knit | st(s) | stitch(es) |
| MC | Main Color | tog | together |
| mm | millimeters |
work even — work without increasing or decreasing in established pattern.
★— work instructions following ★ as many more times as indicated in addition to the first time.
( ) or [ ] — work enclosed instructions as many times as specified by the number immediately following or work all enclosed instructions in the stitch or space indicated or contains explanatory remarks.
GAUGE
Correct gauge is essential for proper size of garments. Needle sizes given in instructions are merely guides and should never be used without first making a sample swatch approximately 4" square in the stitch, yarn, and needle specified. Measure it, counting your stitches and rows carefully; if you have more stitches per inch than specified, try again with a larger size needle; if fewer, try again with a smaller size. Keep trying until you find the size that will give you the specified gauge. DO NOT HESITATE TO CHANGE NEEDLE SIZE TO OBTAIN CORRECT GAUGE.
MARKERS
Place markers as instructed. You may use purchased markers or tie a length of contrasting yarn around the needle. When you reach a marker on each row, slip it from the left needle to the right needle; remove it when no longer needed. Markers are sometimes needed to mark the beginning of Armholes; loop a short piece of yarn around the first and last stitch of the row indicated.
DECREASING
Knit 2 stitches together (K2 tog).
WEAVING SEAMS
With pieces right sides together, catch one strand from each edge, being careful to match rows (Fig. 1).
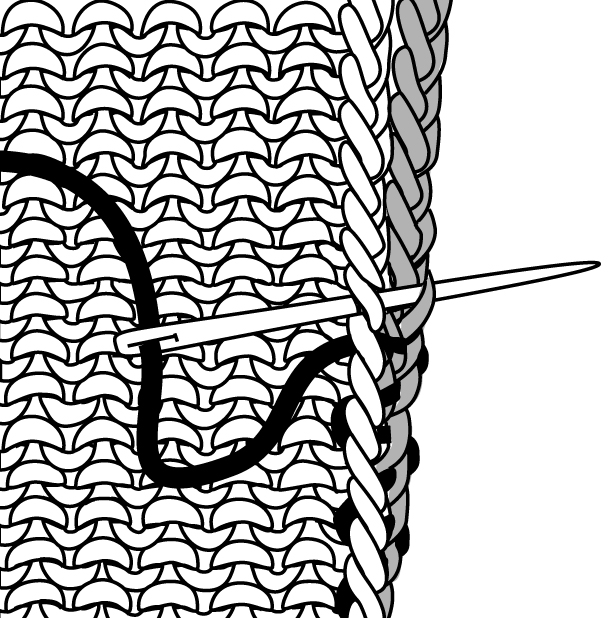
Fig. 1
FINISHING
Good finishing techniques make a big difference in the quality of any piece. Make a habit of taking care of loose ends as you work. To keep loose ends from showing, always weave them back through several stitches or work over them. When ends are secure, cut close to work.
Size Note: Hat is written for One Size Only. Instructions for sweater are written for sizes 6 and 12 months in first set of braces with sizes 18 and 24 months in second set of braces. Instructions will be easier to read if you circle all the numbers pertaining to your size.
Norwegian Sweater & Hat
Sizes: 6, 12, 18 and 24 months
MATERIALS
Worsted Weight yarn, approximately:
Main Color: {6‑6}{7‑7} ounces,
[{170‑170}{200‑200} grams]
Color A: {2‑2}{3‑3} ounces, [{60‑60}{90‑90 grams]
Color B: 1 ounce, (30 grams) for all sizes
Knitting needles sizes 6 (4.0 mm) and 7 (4.5 mm)
or sizes needed for gauge
Yarn Needle
Crochet hook (for Button loop only)
½" Buttons ‑ 2
GAUGE: With larger size needles in Stockinette
Stitch, 5 sts = 1", 7 rows = 1"
SWEATER
BACK
Ribbing
With MC and using smaller size needles, cast on {51‑53}{57‑59} sts loosely. Work in K1, P1 ribbing for {1‑1¼}{1½‑1½}".
BodyChange to larger size needles.
Row 1 (Wrong side): Purl across.
Note: To avoid holes when changing colors, always pick up new color from beneath the dropped yarn keeping the color which has just been worked to the left. Carry unused color across row, twisting it around the yarn being used (Fig. 2) AND TAKING CARE TO KEEP TENSION EVEN.
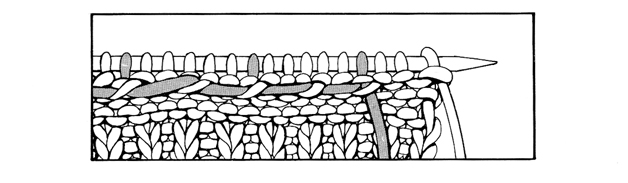
Fig. 2
Work in Stockinette Stitch following Chart 1, Rows 2‑26, changing colors as necessary.
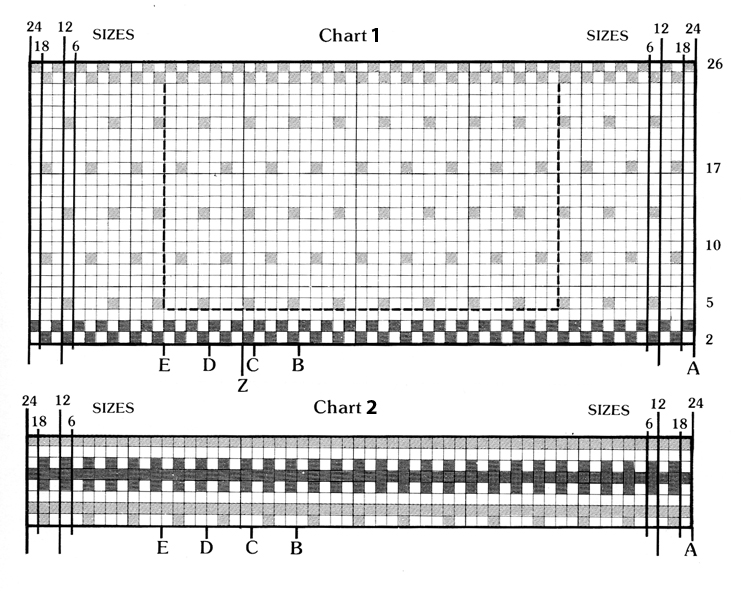
Continue to follow Chart 1, repeating Rows 10‑17 until piece measures {7-7½}{8-8¼}" from cast on edge. Mark each side for Armholes (see Markers).
Continue to repeat Rows 10‑17 until Armholes measure {1½‑1¾}{2‑2}" above markers, ending by working 3 rows with MC.
Follow Chart 2 (page 4), then work 2 rows with MC; cut yarn.
Shoulder Ribbing
With Color B and using smaller size needles, work in K1, P1 ribbing for {6‑6}{8‑8}
rows. Bind off in ribbing.
FRONT
Work same as Back following Chart 1 through Row 4.
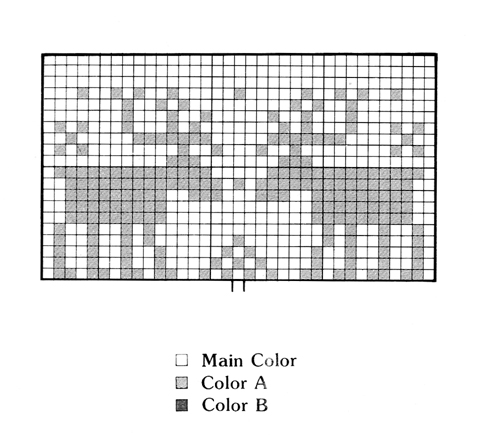
Continuing to follow Chart 1, work Reindeer from Chart 3, between dotted lines of Chart 1.
Continue working Front same as Back to the shoulder ribbing.
Shoulder Ribbing
With Color B and using smaller size needles, work in K1, P1 ribbing for {2‑2}{4‑4}
rows.
Next row: Work {12‑12}{13‑13} sts in ribbing, bind off {27‑29}{31‑33} sts in ribbing, work remaining sts in ribbing: {12‑12}{13‑13} sts each side.
Work {12‑12}{13‑13} sts in ribbing, skip bound off sts, attach second yarn and work {12‑12}{13‑13} sts in ribbing.
Work 2 more rows of ribbing. Bind off all sts in ribbing.
SLEEVE (Make 2)
Ribbing
With MC and using smaller size needles, cast on {26‑30}{34‑38} sts loosely. Work in K1, P1 ribbing for {1-11/4}{11/2-11/2}", increasing 9 sts evenly spaced across last row: {35‑39}{43‑47} sts.
Body
Change to larger size needles.
Row 1 (Wrong side): Purl across.
Row 2: Following Chart 1 from right to left, changing colors as necessary, knit across from A to {B‑C}{D‑E}.
Row 3:Purl across, following Chart 1 from left to right. Continue following Chart 1 through Row 24.
Sizes 6, 12 and 18 months ONLY: Follow Chart 2 for 8 rows, then work {2‑4}{4}
rows with MC.
Bind off loosely.
Size 24 months ONLY: Work Row 9 of Chart 1; work 3 rows with MC; follow Chart 2 for 8 rows; work 4 rows with MC. Bind off loosely.
FINISHING
Seams: Weave
shoulder seams matching ribs (Fig. 1).Weave Sleeve to Sweater
between markers. Weave underarm and side in one continuous seam.
Button Placement: Sew button on Front neck opening 1" from each shoulder seam.
Button Loop: With Color B and using crochet hook, work a ch 5 loop on Back neck opening opposite each button.
HAT (One size)
With MC and using smaller
size needles, cast on
80 sts loosely.
Work in K1, P1 ribbing for 2½".
Change to larger size needles.
Row 1 (Wrong side): Purl across.
Rows 2 and 3: Work in Stockinette Stitch.
Row 4: Beginning on Row 2 of Chart 1, changing colors as necessary, knit from A to Z twice.
Row 5: Purl across from Z to A twice.
Continue working Chart 1 through Row 21.
With MC work 6 rows, ending by working a wrong side row.
Shaping Row 1 (Decrease row): Continuing with MC, knit across decreasing 20 sts evenly spaced (see Decreasing): 60 sts.
Row 2 and all wrong side rows: Purl across.
Row 3: Knit across, decreasing 19 sts evenly spaced: 41 sts.
Row 5: Knit across, decreasing 14 sts evenly spaced: 27 sts.
Row 7: K2 tog across to last st, K1: 14 sts.
Row 9: K2 tog across: 7 sts.
Cut yarn, leaving an 18" length. Using yarn needle, draw yarn tightly through last 7 sts.
Weave back seam (Fig. 1).
Pom‑pom
With Color B, make a pom‑pom and attach to top of Hat.
Note: On Charts 1 and 2, the letters A-E are referred to when working the Sleeves and the letters A-Z are referred to when working the Hat.
Originally published in Leaflet 325, Beautiful Baby Boutique. We have made every effort to ensure that these instructions are accurate and complete. We cannot, however, be responsible for human error, typographical mistakes, or variations in individual work.
©2022 by Leisure Arts, Inc. All rights reserved. This digital publication is protected under federal copyright laws. Reproduction or distribution of this digital publication or any other Leisure Arts publication, including publications which are out of print, is prohibited unless specifically authorized. This includes, but is not limited to, any form of reproduction or distribution on or through the Internet, including posting, scanning, or e-mail transmission.
Recent Posts
-
")
How to Loom Knit MR. GNOME: Free Pattern (with video tutorials)
Say hello to Mr. Gnome! He is so cute and super easy to make! This is a great project for beginners. …Jun 8th 2023 -

Learn to Loom Knit with a Circular Loom
Loom knitting is a different version of regular knitting that’s created on a pegged loom instead of …Jun 2nd 2023 -

Learn to Punch Needle
Have you ever been curious about punch needle crafts? I have been for a while, so I took some time t …May 26th 2023