
Knit a Gorgeous, Green Afghan
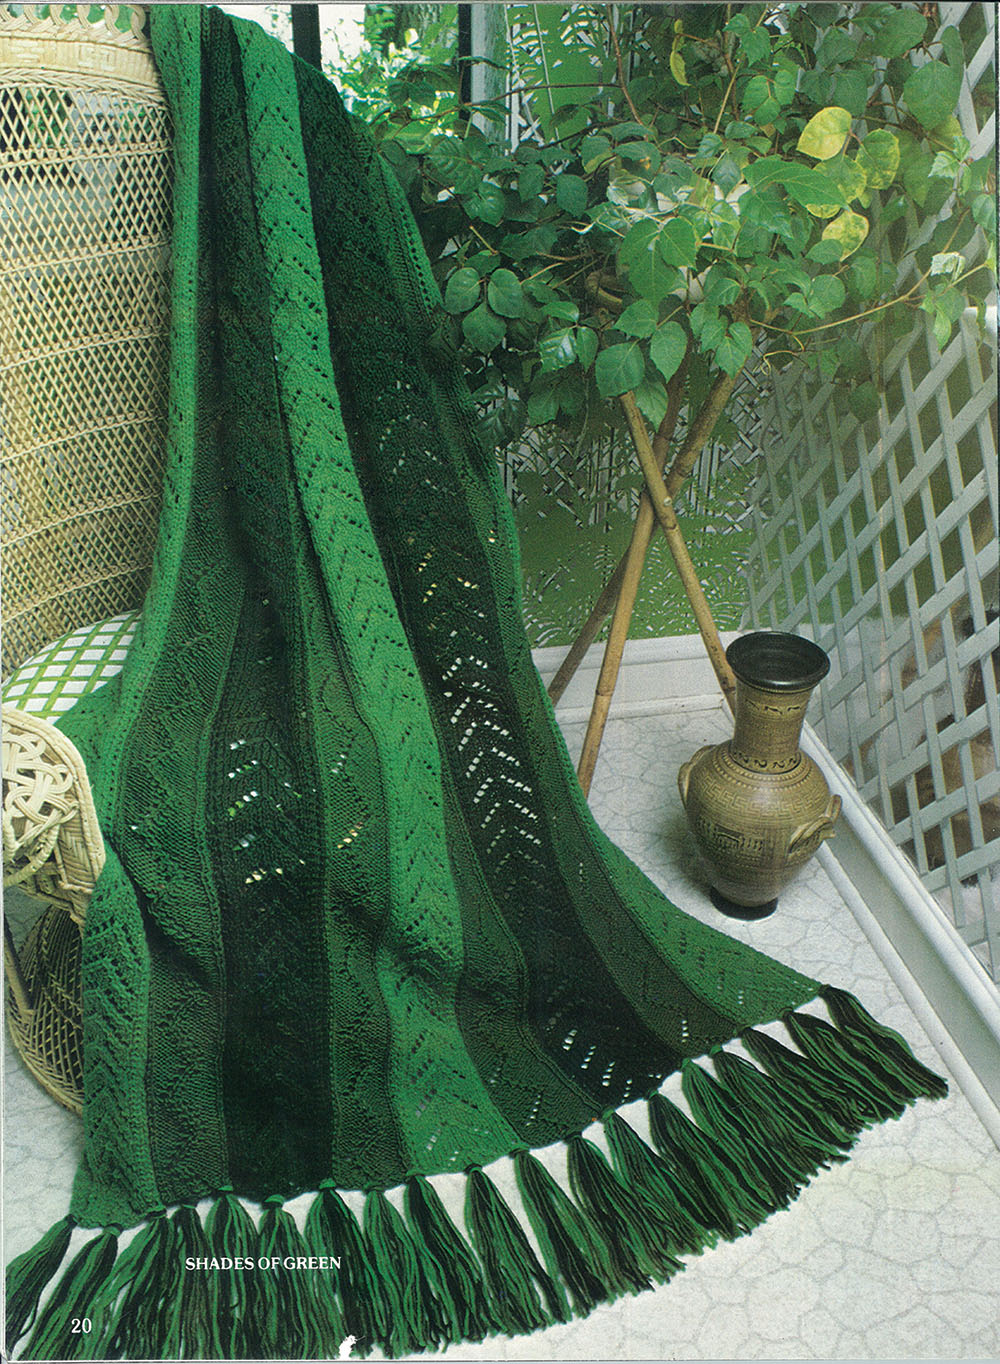
Prepare for spring with a verdant afghan!
In this week's blog post, learn how to knit with a free project!
As always, we would love to see your work! If you make this project, tag us on social media with #leisurearts.
-Leisure Arts Team
SIZE: Approx 42” x 66” before fringing
MATERIALS: Worsted wt yarn, 12 oz each lt green (A) and med green (B), 8 oz dk green (C); 10” or 14” straight knitting needles size 10½ (Canadian size 2) or size needed for gauge.
GAUGE: In stock st, 7 sts = 2”; 5 rows = 1”
INSTRUCTIONS
Note: Throughout pattern, “sl 1” means to slip the st as to knit Center Panel A (V-Stitch): With Color A, CO 17 sts loosely. Row 1 (right side): K1, YO, K2 tog, K1, YO, sl 1, K1, PSSO, K5, K2 tog, YO, K1, sl 1, K1, PSSO, YO, K1. Rows 2, 4, 6 and 8: Purl across. Row 3: K1, YO, K2 tog, K2, YO, sl 1, K1, PSSO, K3, K2 tog, YO, K2, sl 1, K1, PSSO, YO, K1. Row 5: K1, YO, K2 tog, K3, YO, sl 1, K1, PSSO, K1, K2 tog, YO, K3, sl 1, K1, PSSO, YO, K1. Row 7: K1, YO, K2 tog, K4, YO, sl 1, K2 tog, PSSO, YO, K4, sl 1, K1, PSSO, YO, K1. Rep Rows 1-8, 37 times more: 304 rows total. BO loosely.
Panel A-1 (V-Stitch): With Color A, CO 19 sts loosely. Note: 3 sts at left edge are worked in garter st throughout panel. Row 1 (right side): K1, Y6O, K2 tog, K1, YO, sl 1, K1, PSSO, K5, K2 tog, YO, K1, sl 1, K1, PSSO, YO, K3. Rows 2, 4, 6 and 8: K3, purl across. Row 3: K1, YO, K2 tog, K2, YO, sl 1, K1, PSSO, K3, K2 tog, YO, K2, sl 1, K1, PSSO, YO, K3. Row 5: K1, YO, K2 tog, K3, YO, sl 1, K1, PSSO, K1, K2 tog, YO, K3, sl 1, K1, PSSO, YO, K3. Row 7: K1, YO, K2 tog, K4, YO, sl 1, K2 tog, PSSO, YO, K4, sl 1, K1, PSSO, YO, K3. Rep Rows 1-8, 37 times more: 304 rows total. BO loosely.
Panel A-2 (V-Stitch): With Color A, CO 19 sts loosely. Note: 3 sts at right edge are worked in garter st throughout panel. Row 1 (right side): K3, YO, K2 tog, K1, YO, sl 1, K1, PSSO, K5, K2 tog, YO, K1, sl 1, K1, PSSO, YO, K1. Rows 2, 4, 6 and 8: Purl to last 3 sts, K3. Row 3: K3, YO, K2 tog, K2, YO, sl 1, K1, PSSO, K3, K2 tog, YO, K2, sl 1, K1, PSSO, YO, K1. Row 5: K3, YO, K2 tog, K3, YO, sl 1, K1, PSSO, K1, K2 tog, YO, K3, sl 1, K1, PSSO, YO, K1. Row 7: K3, YO, K2 tog, K4, YO, sl 1, K2 tog, PSSO, YO, K4, sl 1, K1, PSSO, YO, K1. Rep Rows 1-8, 37 times more: 304 rows total. BO loosely.
Panel B (Zig-Zag Stitch)—(make 4): With Color B, CO 15 sts loosely. Row 1 (right side): K2, P2, YO, sl 1, K2 tog, PSSO, YO, P6, K2. Row 2: P2, K7, P1, K3, P2. Row 3: K2, P3, YO, sl 1, K2 tog, PSSO, YO, P5, K2. Row 4: P2, K6, P1, K4, P2. Row 5: K2, P4, YO, sl 1, K2 tog, PSSO, YO, P4, K2. Row 6: P2, K5, P1, K5, P2. Row 7: K2, P5, YO, sl 1, K2 tog, PSSO, YO, P3, K2. Row 8: P2, K4, P1, K6, P2. Row 9: K2, P6, YO, sl 1, K2 tog, PSSO, YO, P2, K2. Row 10: P2, K3, P1, K7, P2. Row 11: K2, P5, YO, K3 tog, YO, P3, K2. Row 12: P2, K4, P1, K6, P2. Row 13: K2, P4, YO, K3 tog, YO, P4, K2. Row 14: P2, K5, P1, K5, P2. Row 15: K2, P3, YO, K3 tog, YO, P5, K2. Row 16: P2, K6, P1, K4, P2. Row 17: K2, P2, YO, K3 tog, YO, P6, K2. Row 18: P2, K7, P1, K3, P2. Rep Rows 1-18, 16 times more: 306 rows total. BO loosely.
Panel C (V-Stitch)—(make 2): With Color C, rep instructions for Center Panel A.
Joining: Place panels in order as shown in Fig. 21. Be sure that right side of each panel is facing, all CO edges are at the same end of afghan, and garter st edges of Panels A-1 and A-2 are at outside edges of afghan. See joining instructions on pg. 32; sew or slip stitch panels tog. Weave in all ends.
| Panel A-1 | V-St Lt Green |
| Panel B | Zig-Zag Med Green |
| Panel C | V-St Dk Green |
| Panel B | Zig-Zag Med Green |
| Panel A | V-St Lt Green |
| Panel B | Zig-Zag Med Green |
| Panel C | V-St Dk Green |
| Panel B | Zig-Zag Med Green |
| Panel A-2 | V-St Lt Green |
Fringe: See Basic Fringe Instructions on pg. 32; cut 22” strands of each color. Use 4 strands of each color for one knot of fringe. Across each short end of afghan, place one knot of fringe at each corner, each joining seam and center of each panel: 19 knots of fringe at each end of afghan.
ABBREVIATIONS
beg ............... begin(ning)
BO ................. bind off
ch(s)............... chain(s)
CO ................. cast on
dc ................... double crochet(s)
dec................. decrease(ing)
dtr ................. double triple crochet(s)
EOR................ every other row
garter st ...... garter stitch (knit every row)
hdc ................ half double crochet(s)
inc ................. increase(ing)
K ..................... knit
P...................... purl
patt................ pattern
PSSO ............. pass slip stitch over
rem ............... remain(ing)
rep ................. repeat
rnd(s) ............ round(s)
sc.................... single crochet(s)
sk.................... skip
sl .................... slip
sl st(s)............ slip stitch(es)
sp(s)............... space(s)
st(s) ............... stitch(es)
stock st......... stockinette stitch (knit 1 row, purl 1 row)
tog ................ together
tr .................... triple crochet(s)
YO ................. yarn over
GAUGE
Hook or needle sizes given in instructions are merely given as guides and should never be used without making a sample swatch to check gauge. To test gauge, make a sample swatch approx 4” square in the pattern stitch and using the yarn and hook or needle specified. Then measure it, counting your stitches and rows carefully. If you have more stitches per inch than specified, try again with a larger size hook or needle; if fewer, try again with a smaller size. Keep trying until you find the size that will give you the specified gauge. DO NOT HESITATE TO CHANGE HOOK OR NEEDLE SIZE TO OBTAIN CORRECT GAUGE.
PARENTHESES
( ) Parentheses are used two ways. When used to show repetition, work directions within the parentheses as many times as specified after the parentheses. For example, “(K1, P1) twice” means to do what is in parentheses two times altogether. Parentheses are also used to set off and clarify a group of stitches that are to be worked all into the same space or stitch: “(3 dc, ch 1, 3 dc) in corner sp” means that the instructions in the parentheses are all to be worked in the one specified space.
HELPFUL HINTS FOR CROCHET PATTERNS
Working in Front or Back Loops: To work “in front loop only” or “in back loop only,” instead of working under both loops of the stitch, insert hook only under front loop (loop toward you) or only under back loop (look away from you).

Edgings: When working edgings, feel free to use a hook size other than the size specified in the pattern. You may need to use a smaller or larger size hook so that your afghan remains flat and even.
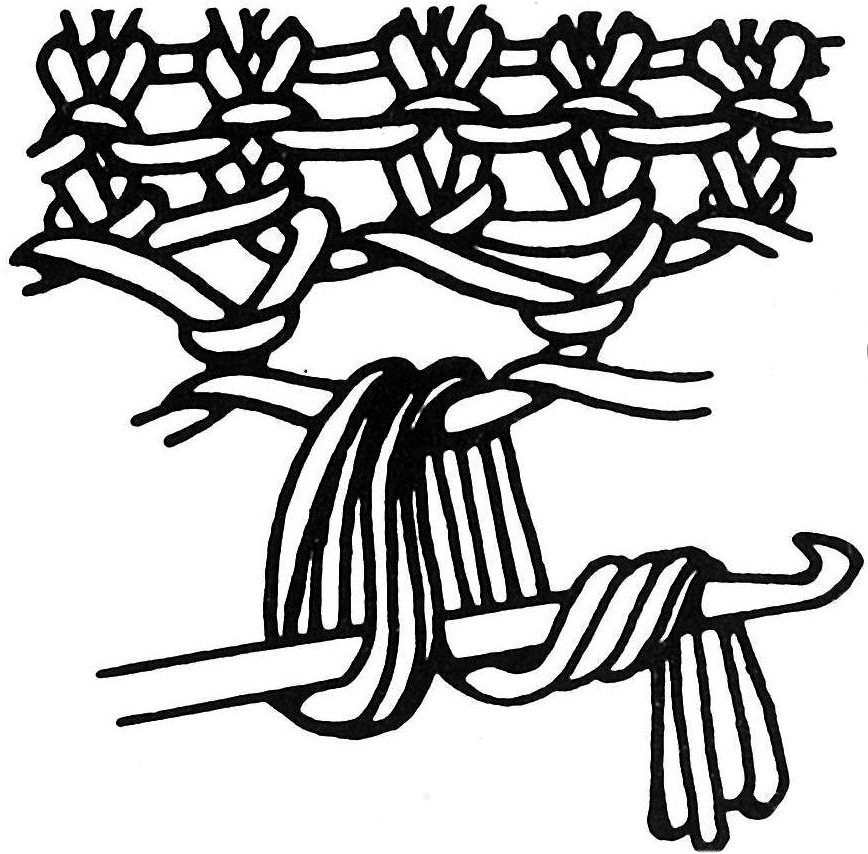
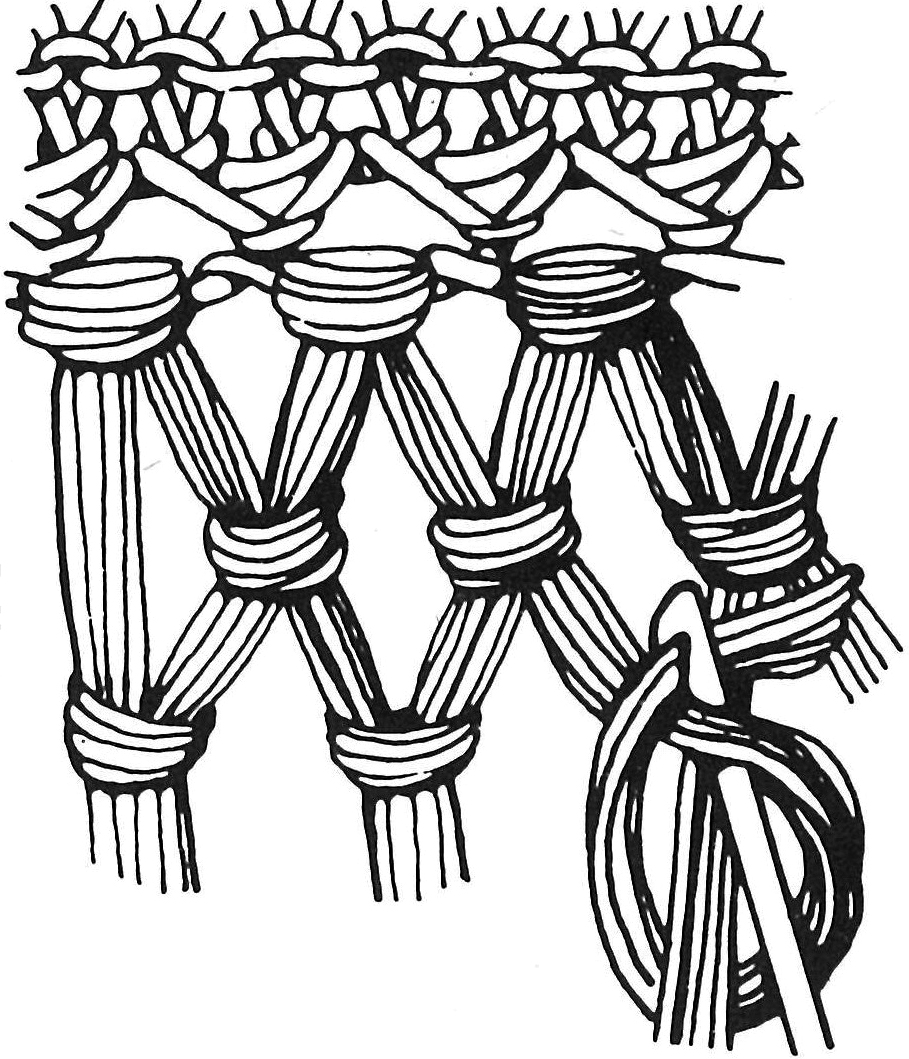
BASIC FRINGE INSTRUCTIONS
Cut a piece of cardboard about 8” wide and half as long as specified in instructions for finished strands. Wind yarn loosely around cardboard, cut across one end when card is filled. Repeat several times and then start fringing; you can wind more strands as you need them. Fringe with wrong side of afghan facing you. For single knot fringe, hold the number of strands specified for one knot of fringe together and fold in half.
 |
|
| Fig. 1 | Fig. 2 |
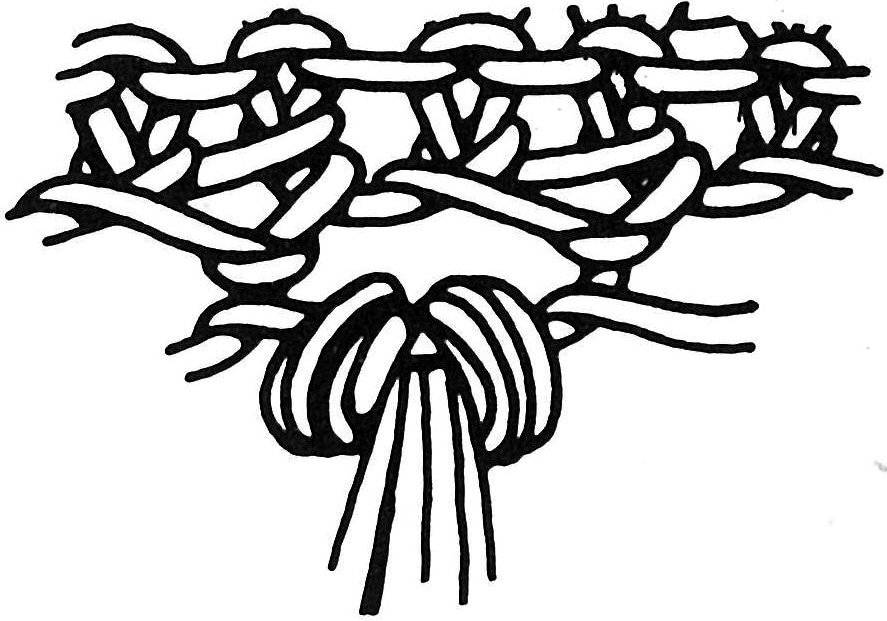
With crochet hook (Fig. 1) draw folded end through space or stitch, pull loose ends through folded section and draw knot up tightly (Fig. 2). Repeat, spaced as specified in individual afghan instructions. Trim ends even.
|
|
| Fig. 3 | Fig. 4 |
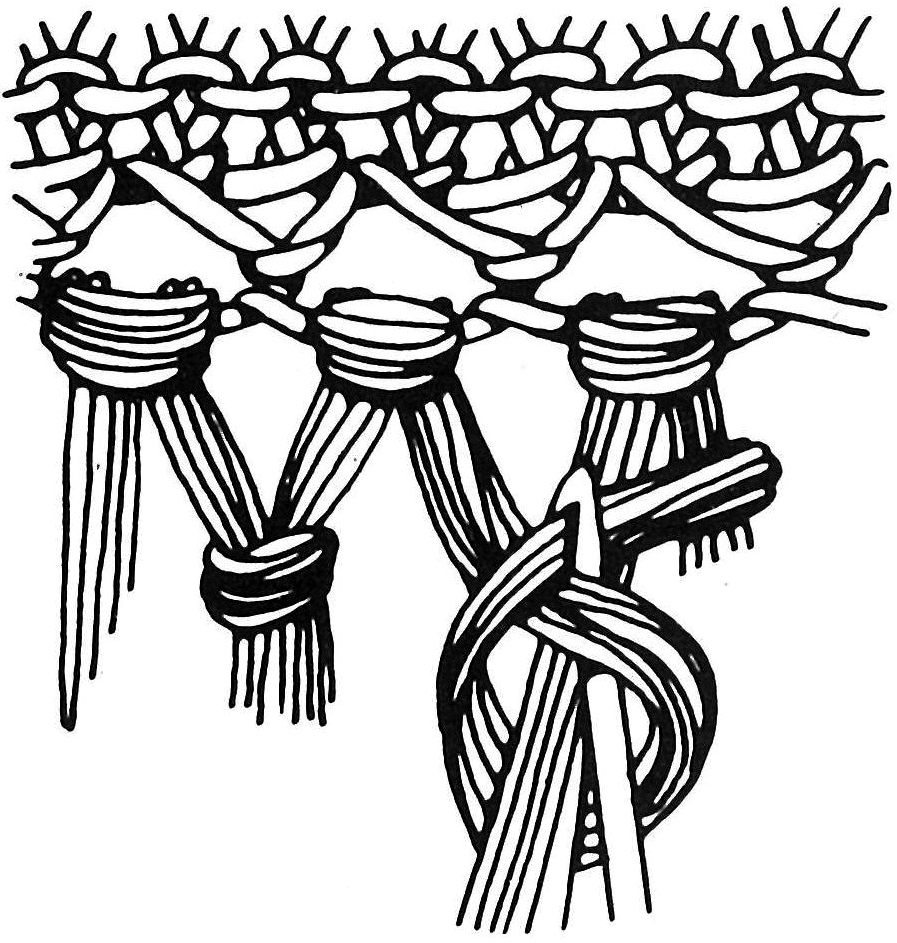
For double knot fringe, after completing fringe as specified above, turn so right side of work is facing you. Work knots as shown in Fig. 3 and Fig. 4.
JOINING INSTRUCTIONS
Seams may be joined in various ways, depending on types of knitted or crocheted fabric or personal preference. Seams should be straight and neat, firm enough to hold, yet elastic enough to give with the fabric. All patterns, colors, borders, etc., should be matched carefully.
Sewing
Place two pieces (squares or panels) with right sides together. Thread yarn into a tapestry or yarn needle; join yarn (no knots, please), leaving ample length of yarn end to weave in, or to work over as you are joining. Insert needle through one stitch at edge of back piece and one st at edge of front piece; pull yarn through to front. Insert needle through the next stitch at edge of front piece and next stitch at edge of back piece; pull yarn through to back. Continue in this manner, matching stitches when possible.
Whipstitch
Place two pieces (squares or panels) with right sides facing you, side by side. Thread yarn into a tapestry or yarn needle; join yarn, leaving ample length of yarn end to weave in or to work over. Insert needle down through the end stitch (st at joining edge) of right-hand piece from front to back and up through the end stitch of left-hand piece from back to front. Then insert needle from front to back of next end stitch of right-hand piece and from back to front of next end stitch of left-hand piece. Continue in this manner; do not pull stitches tightly, keep work flat and match stitches when possible.
Slip Stitch
Place two pieces (squares or panels) with right sides together. With a crochet hook, join yarn with a slip stitch in first stitch at edge of both pieces to be joined; ch 1, slip stitch in each end stitch of both pieces across (inserting hook into both stitches to make each slip stitch); carefully match stitches when possible.
Zig-Zag Slip Stitch
Note: When joining, yarn is to be held at wrong side (beneath work), hook inserted from right to wrong side and yarn drawn up from beneath work to top of work.
Place two pieces (squares or panels) to be joined with right sides facing, side by side. With crochet hook, join yarn with a slip stitch in one stitch at corner of joining edge of first piece, ch 1. Slip stitch in same stitch as joining, then slip stitch in corresponding stitch of second piece. Slip stitch in next stitch of first piece, then in corresponding stitch of second piece. Continue across in this manner.
BASIC AFGHAN STITCH INSTRUCTIONS
Just as in regular crochet, all afghan stitch patterns start with a chain. A row of afghan stitch is always done in two steps: first from right to left, then back again from left to right. In instructions, these two steps are considered one row. To practice, ch 14, then follow instructions below, taking care to work loosely. Work until piece measures about 4” long, then bind off as specified below.
Row 1 (Foundation Row)
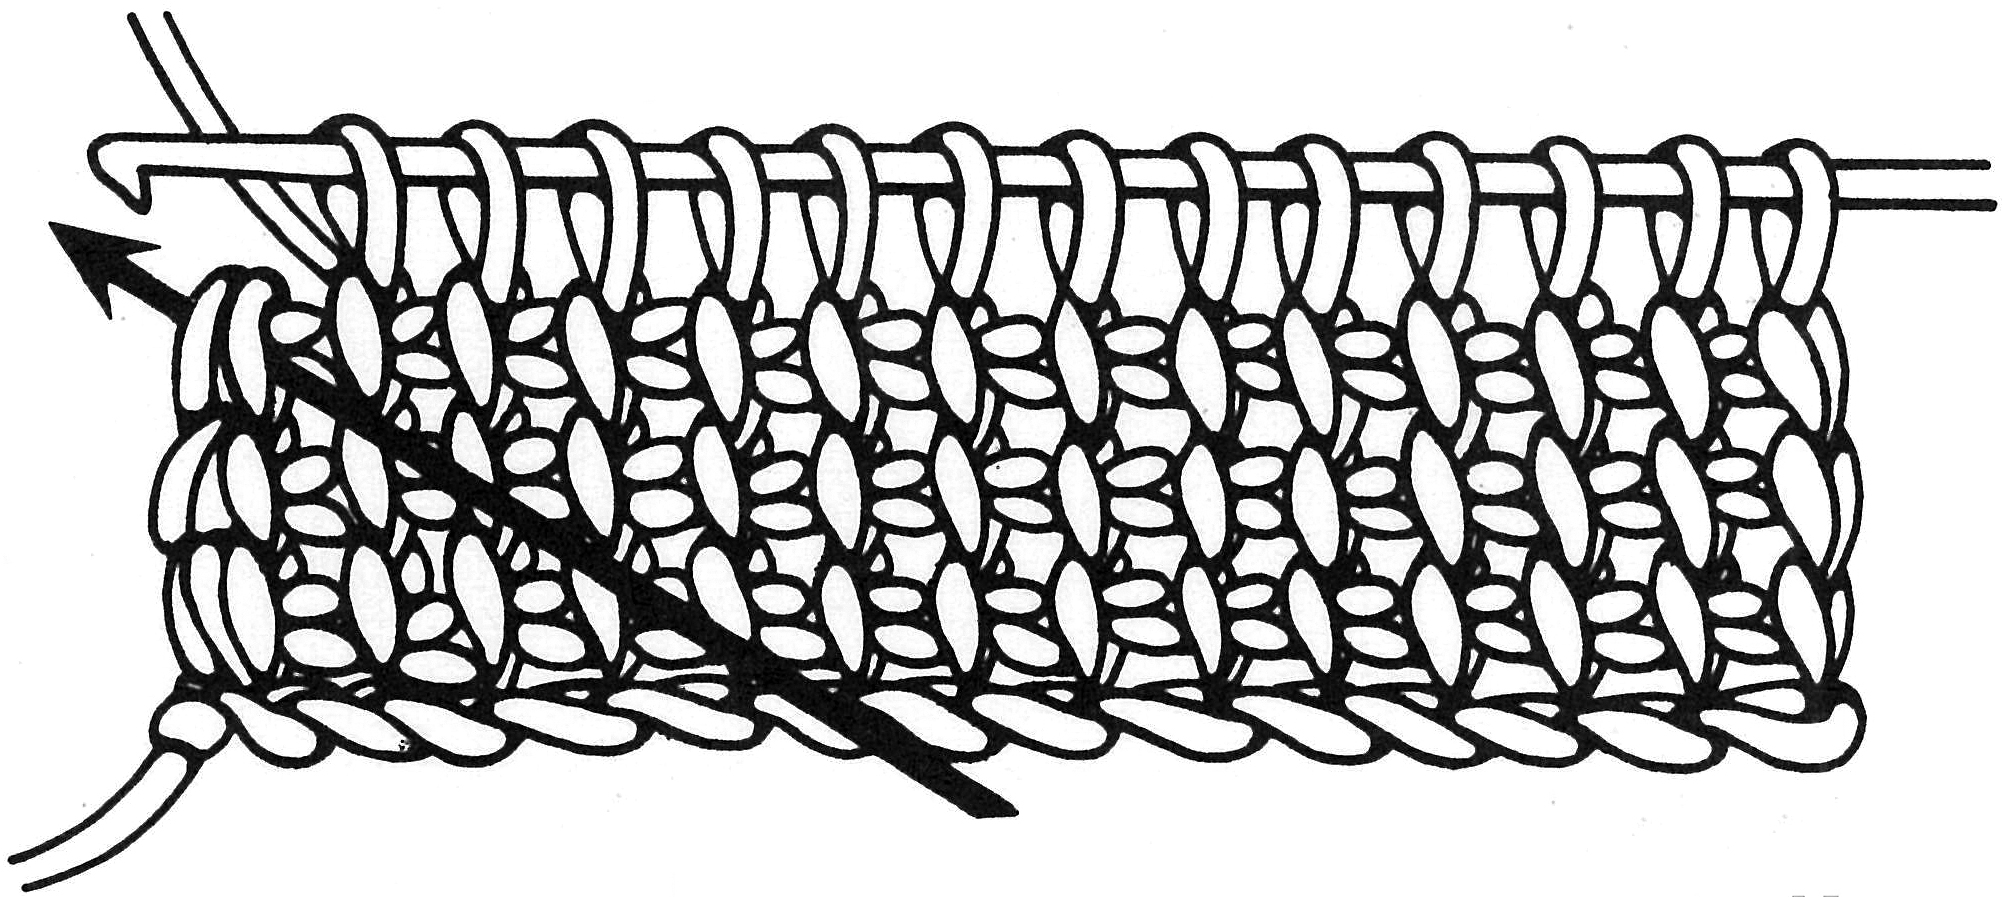
First Half: Sk first ch from hook, * insert hook through top loop only (Fig. 5) of next ch, hook yarn and draw through, forming loop on hook (you will now have added a loop). Rep from * across (Fig. 6) to end of ch, keeping all loops on hook. You should have the same number of loops on hook as the number of chs with which you started. DO NOT TURN WORK.
|
|
| Fig. 5 | Fig. 6 |
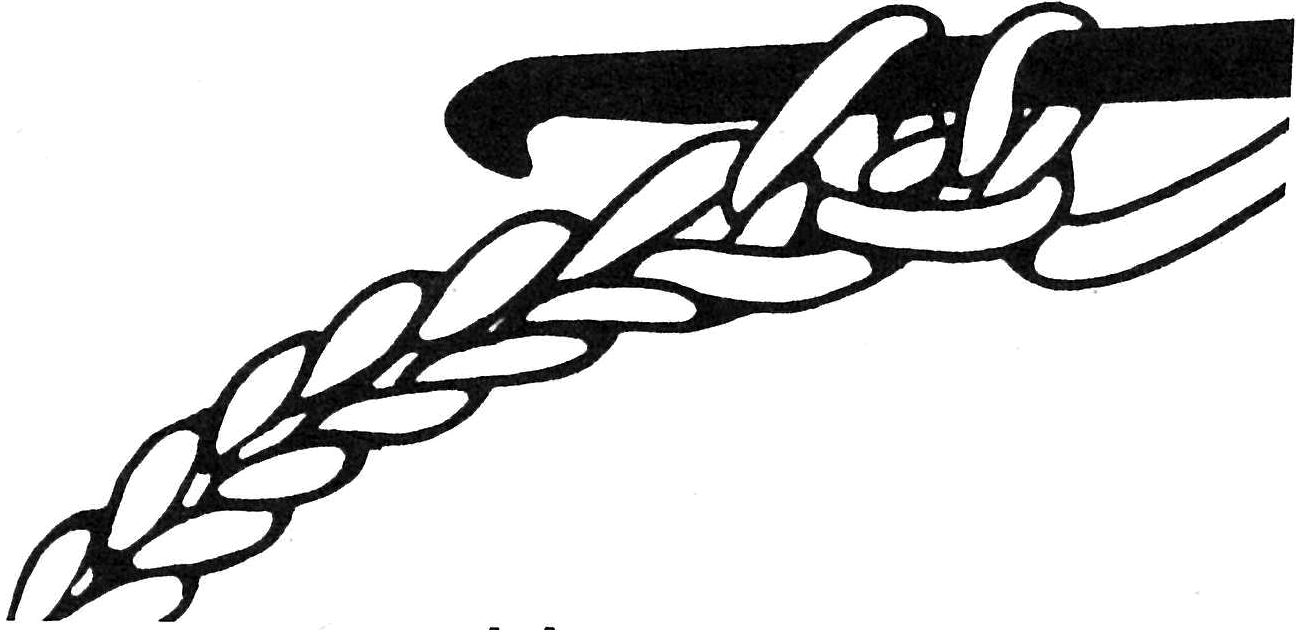
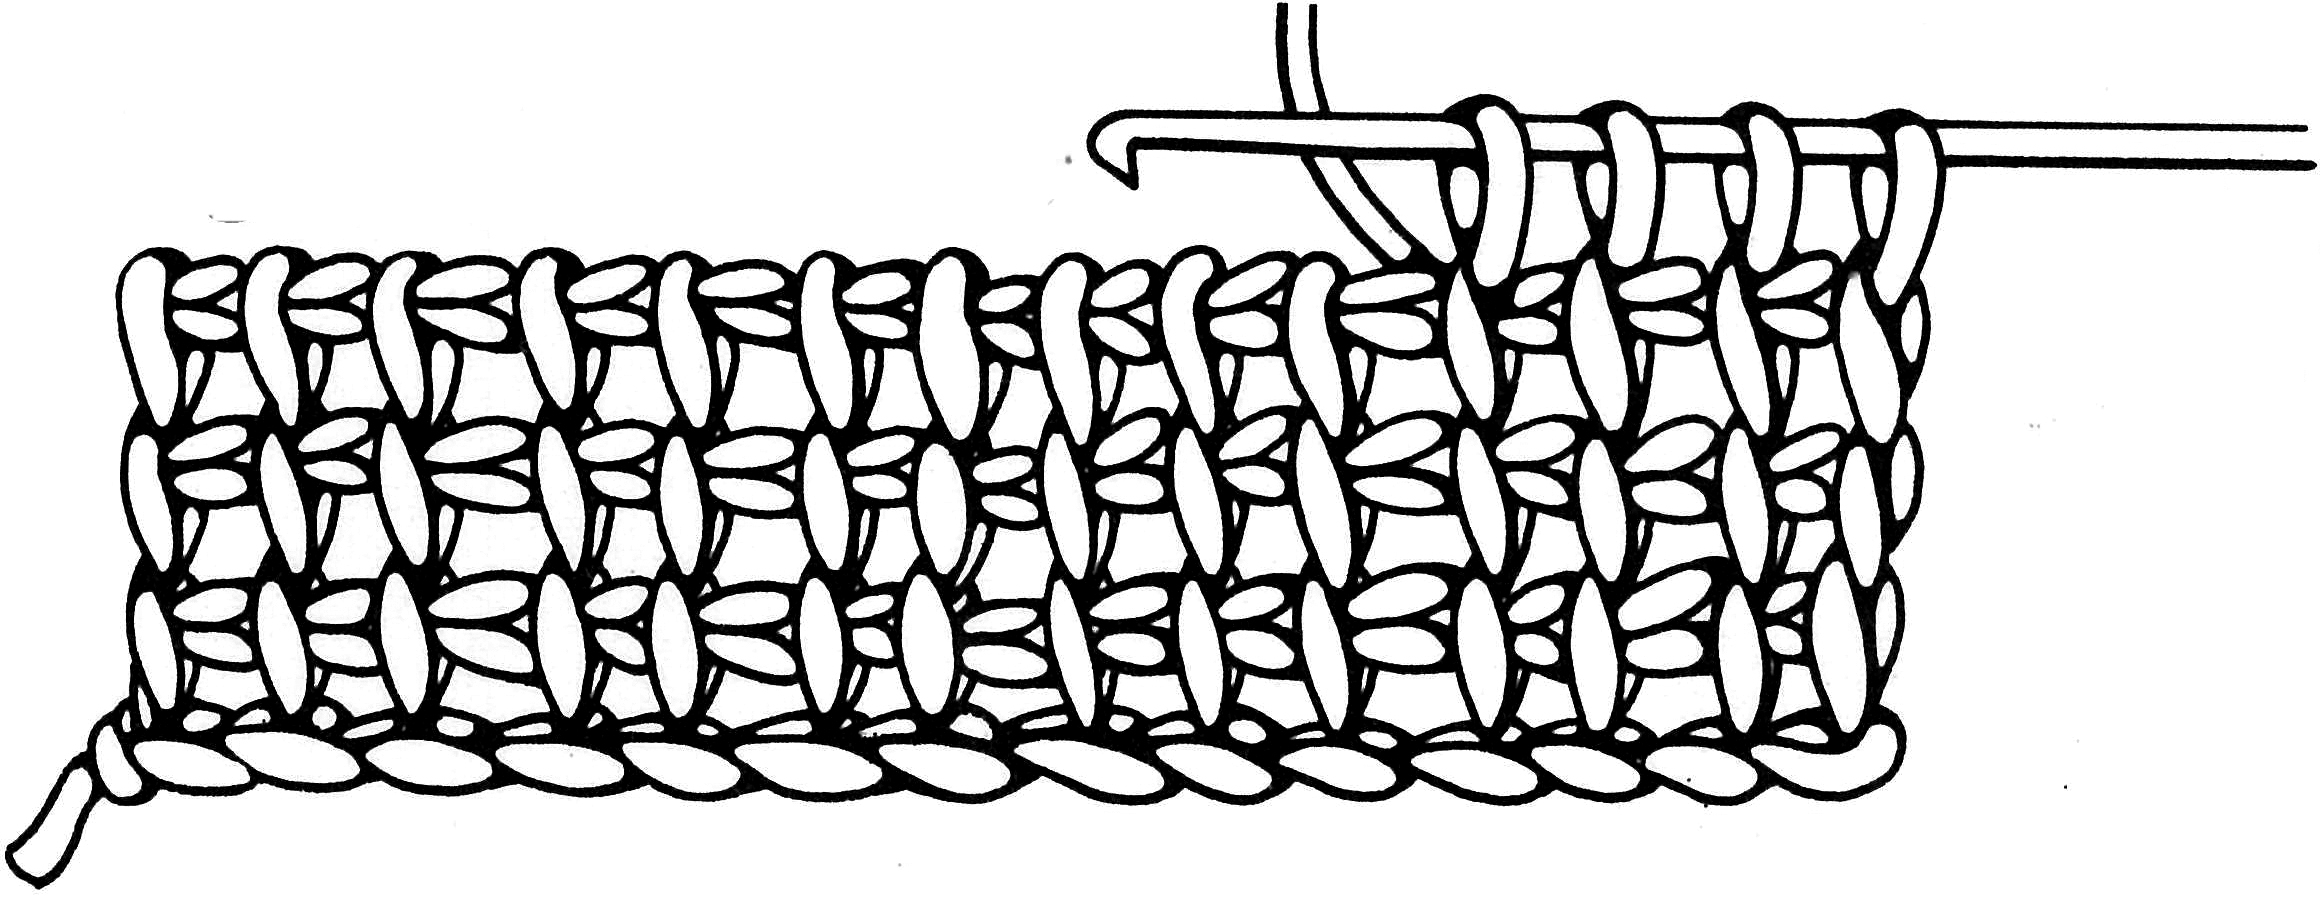
Second Half: YO hook and draw through first loop; * YO hook and draw through 2 loops; rep from * (Fig. 7) across row. One loop should remain on hook; this is the first stitch of next row.
|
| Fig. 7 |
Row 2
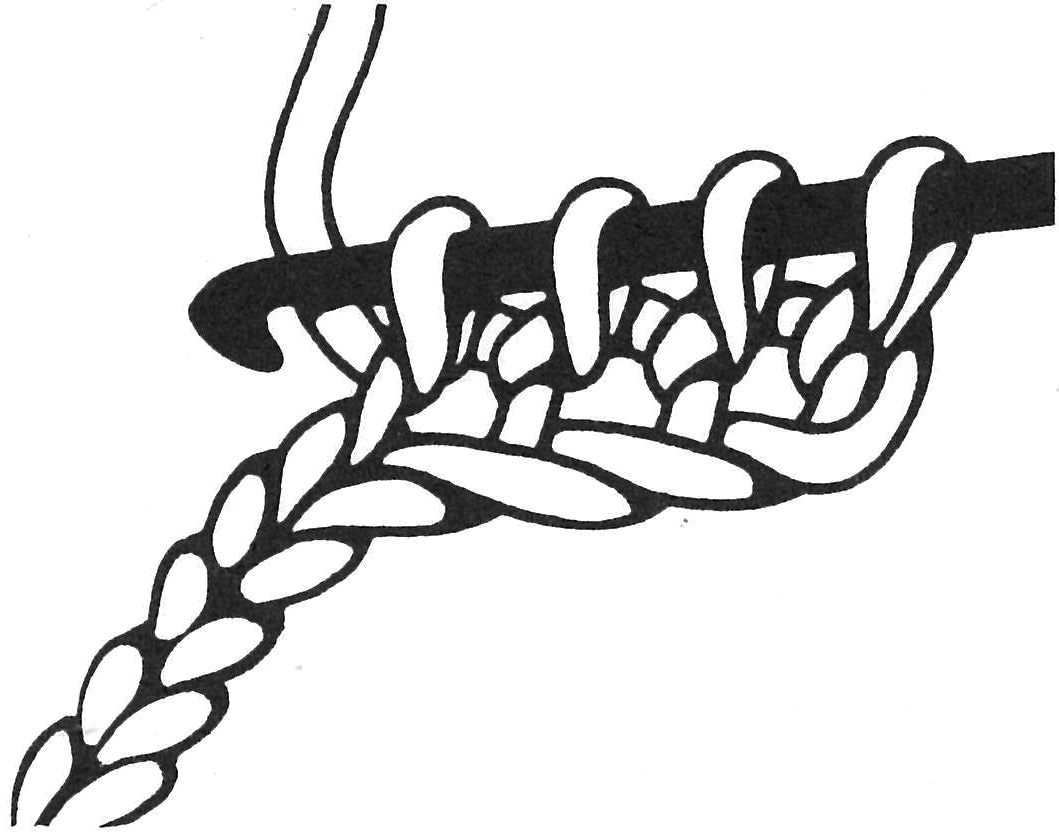
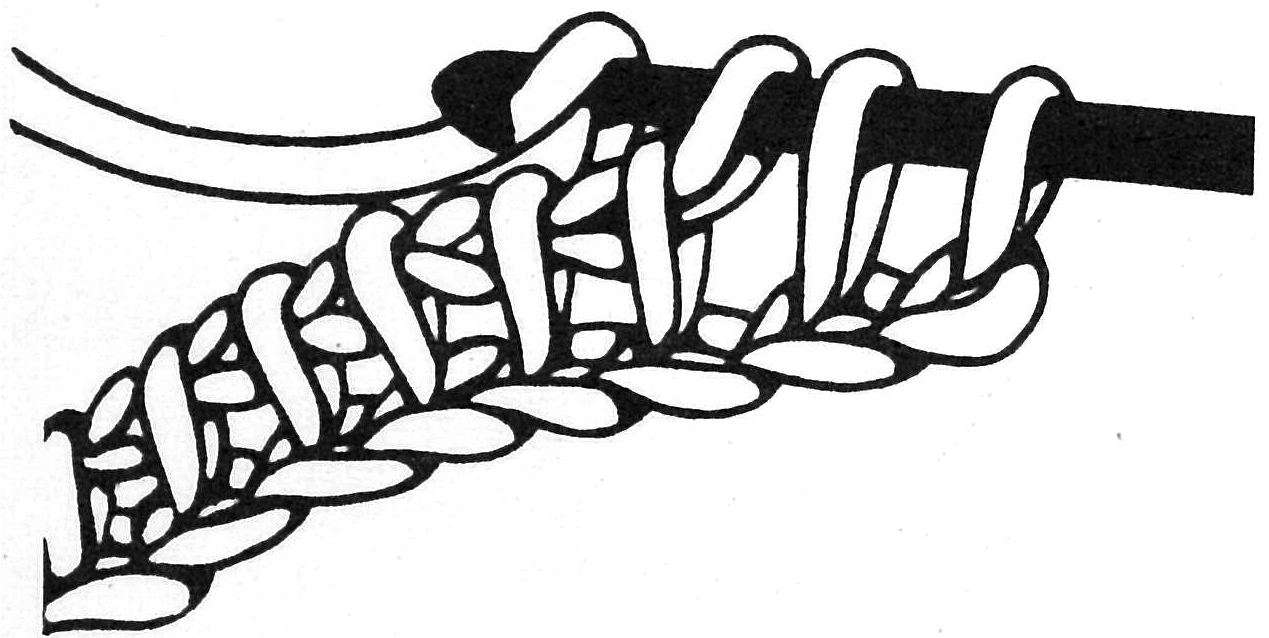
First Half: Insert hook in upright part (called a bar) of next st (Fig. 8); hook yarn and draw through, forming a new loop on hook. Draw up a loop in similar manner in each bar to last bar. On this final bar, for a firmer edge, insert hook in bar and yarn behind it (Fig. 9) and work them together as one bar. There should still be the same number of loops on hook as the number of starting chs. If you’re short a loop, you’ve probably missed picking up the last bar at the end of the row.
|
|
| Fig. 8 | Fig. 9 |
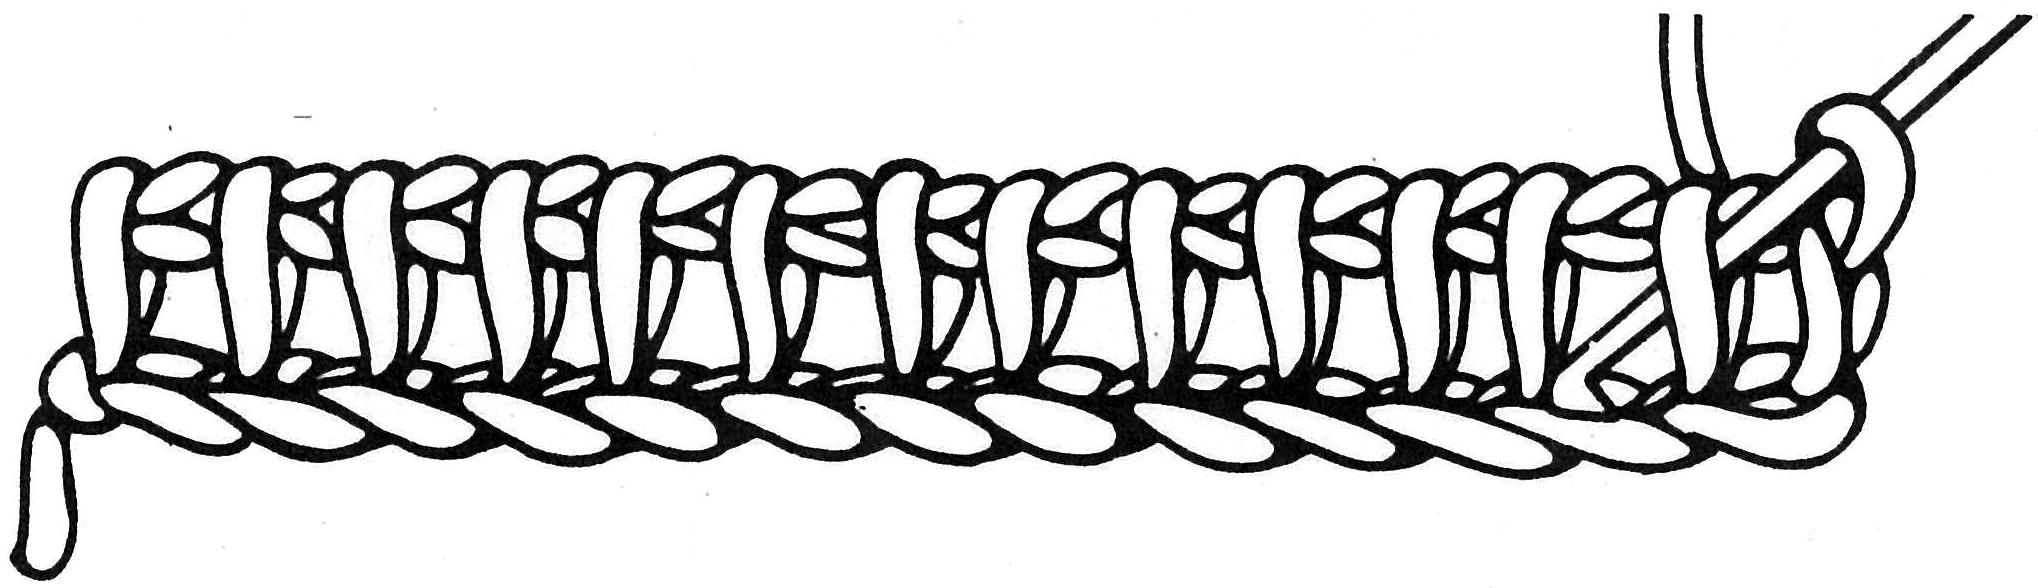
Second Half: Same as Second Half of Foundation Row. Rep Row 2 for Basic Afghan Stitch. Your work will begin to look like (Fig. 10).
|
| Fig. 10 |
Binding Off
Afghan Stitch is the only crochet stitch that needs to be bound off after the last row. To bind off, skip first bar, * insert hook in next bar, hook yarn and loosely draw through both bar and loop on hook: you have made a slip stitch, and just one loop remains on hook; rep from * across. Break yarn, draw through last loop and finish off.
CROSS STITCH ON AFGHAN STITCH INSTRUCTIONS
Many beautiful afghans are first worked in afghan stitch, then embroidered in cross stitch. The embroidery is worked by referring to a chart with squares containing colors or symbols for colors to be used for cross stitches; each of these squares represents one complete cross stitch.
|
| Fig. 11 |
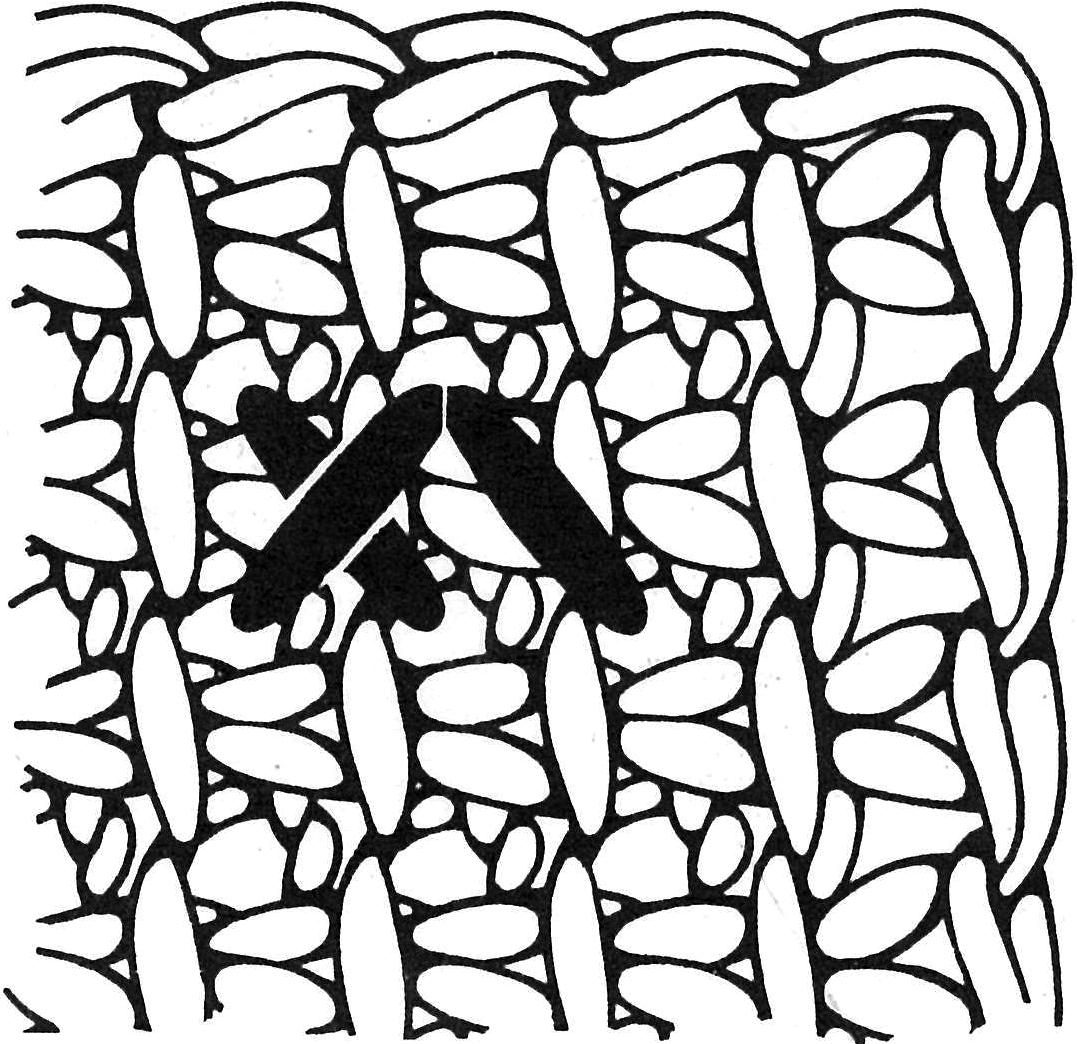
To work cross stitch on afghan stitch, thread a tapestry or yarn needle with an 18” strand of desired color yarn. Look at your afghan stitch: note that each afghan stitch has an upright bar; cross stitches are worked over these bars (see Fig. 11). Count to find the stitch with which you wish to begin, bring needle up from back through first hole, leaving a 3” tail of yarn on back to be worked over to secure; bring down in next hole diagonally up, pulling yarn flat against fabric, but not so tight as to pucker fabric. You have now made one half of a cross stitch; you can either complete that stitch now, or work across area in half crosses, then work back, crossing them as you go. Just be sure that the top stitch of every cross stitch is worked in the same direction (i.e., lower left to upper right). Finish off yarn by weaving through a few stitches on back of work.
©2022 by Leisure Arts, Inc. All rights reserved. This digital publication is protected under federal copyright laws. Reproduction or distribution of this digital publication or any other Leisure Arts publication, including publications which are out of print, is prohibited unless specifically authorized. This includes, but is not limited to, any form of reproduction or distribution on or through the Internet, including posting, scanning, or e-mail transmission.
Recent Posts
-
")
How to Loom Knit MR. GNOME: Free Pattern (with video tutorials)
Say hello to Mr. Gnome! He is so cute and super easy to make! This is a great project for beginners. …Jun 8th 2023 -

Learn to Loom Knit with a Circular Loom
Loom knitting is a different version of regular knitting that’s created on a pegged loom instead of …Jun 2nd 2023 -

Learn to Punch Needle
Have you ever been curious about punch needle crafts? I have been for a while, so I took some time t …May 26th 2023