
Practice Your Crochet with Grapevine Filet
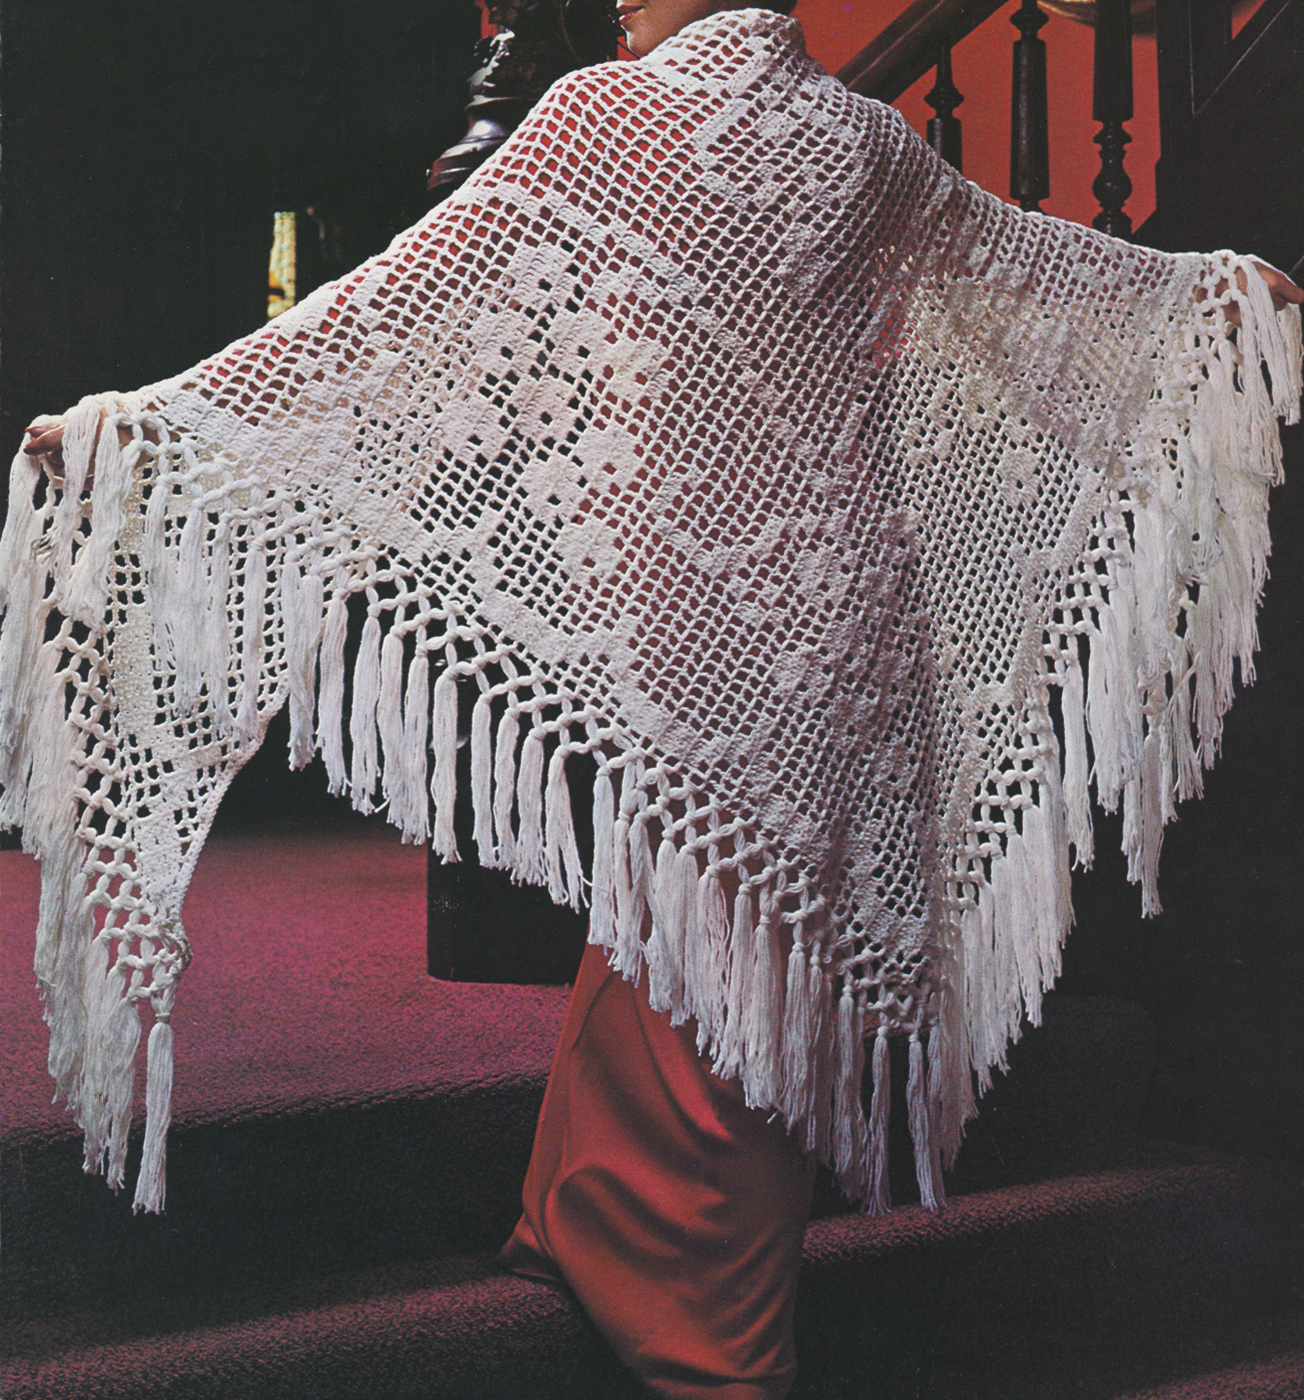
Filet crochet isn't just for doilies anymore!
In this week's blog post, learn how to filet crochet with a free project!
Filet crochet is an old form of crochet which is becoming popular again! It is worked from a chart in which the empty squares represent spaces and filled‑in squares represent blocks, which are usually made from chunkier double crochet or treble crochet stitches, creating a pixel art effect.
Once you've mastered this technique, you can chart out all sorts of new designs like shapes, simple objects and words! This project is a fun starting point to crochet the shawl of your dreams.
As always, we would love to see your work! If you make this project, tag us on social media with #leisurearts.
-Leisure Arts Team
Finished Size: 78" x 40", excluding fringe
MATERIALS
Baby weight or fingering weight yarn, 20 oz white
Crochet hook, size D (3.25 mm) or size needed for gauge
GAUGE
9 sps = 5"; 9 rows = 5"
Gauge Note: Each sp and each block must be exactly as wide as it is high or the shawl will not be triangular. Make certain that row and st gauges measure exactly the same.
ABBREVIATIONS
| bl | block | sc | single crochet |
| ch | chain | sk | skip |
| dec | decrease | sp(s) | space(s) |
| prev | previous | st(s) | stitch(es) |
| rem | remaining | tr | treble crochet |
| rep | repeat | YO | Yarn Over |
Filet crochet is an old form of crochet which is becoming popular again. It is worked from a chart in which the empty squares represent spaces and filled‑in squares represent blocks. After you work the practice swatch, compare it with Fig. 1. You should have blocks on your swatch where there are black squares in the chart, and spaces in your swatch where there are empty spaces in the chart. Once you have worked the small swatch, you should be able to work the shawl from Fig. 2, making a space where indicated by an empty space on Fig. 2. and a block where there is a black space on the chart.
PRACTICE SWATCH
Ch 24 loosely.
Row 1: Tr in 9th ch from hook, H ch 2, sk 2 ch, tr in next ch; rep from H across: 6 sps made; ch 5, turn, (ch 5 counts as first tr and ch 2 of next row).
Row 2: Tr in next tr (sp made), ch 2, tr in next tr (sp made), in next sp, work a bl as follows: work a tr until 2 loops rem on hook, YO twice, insert hook in same sp, hook yarn and pull through, (YO and pull through 2 loops) twice; 3 loops rem on hook, YO and pull through all 3 loops (tr dec made), tr in next tr (bl made), work a bl in next sp, ch 2, tr in next tr, ch 2, tr in 3rd ch of turning ch, (2 sps made), ch 5, turn.
Row 3: Work a sp, bl, sp, sp, bl, sp; ch 5, turn.
Row 4: Work a sp, ch 2, sk tr dec which forms bl of prev row, tr in next tr, bl, bl, ch 2, sk tr dec of prev row, tr in next tr, ch 2, tr in 3rd ch of turning ch, ch 5, turn.
Row 5: Sp, sp, bl, bl (working tr dec in tr dec of prev row), sp, sp; ch 5, turn.
Row 6: Work sps across, finish off. Piece should measure approximately 3½" x 3½".
To work diagonal edge: Work to within 2 tr of end of row (not counting ch 5), tr in next tr, do not ch, tr in 5th ch of turning ch, ch 5, turn.
Next Row: Tr in next tr, continue patt from chart. You have dec 1 sp, a diagonal line should be formed. This will be the top or shoulder edge of the shawl.
Fig. 1
SHAWL
Ch 294 loosely.
Row 1: Tr in 9th ch from hook, work sps across row to last 3 chs, do not ch after last tr, end tr in last ch, ch 5, turn. You should have 96 sps counting diagonal sp at end of row.
Row 2: Tr into next tr (this forms diagonal edge), then begin working from Fig. 2 being sure to beg at Row 2. Continue to end and begin rows at diagonal top edge as for Rows 1 and 2. At end of last row on chart, end ch 1, turn and work sc along diagonal edge, taking care to space sts to keep work flat. At end, ch 1, turn. Sc in each sc. Finish off. Lightly steam rows of sc.
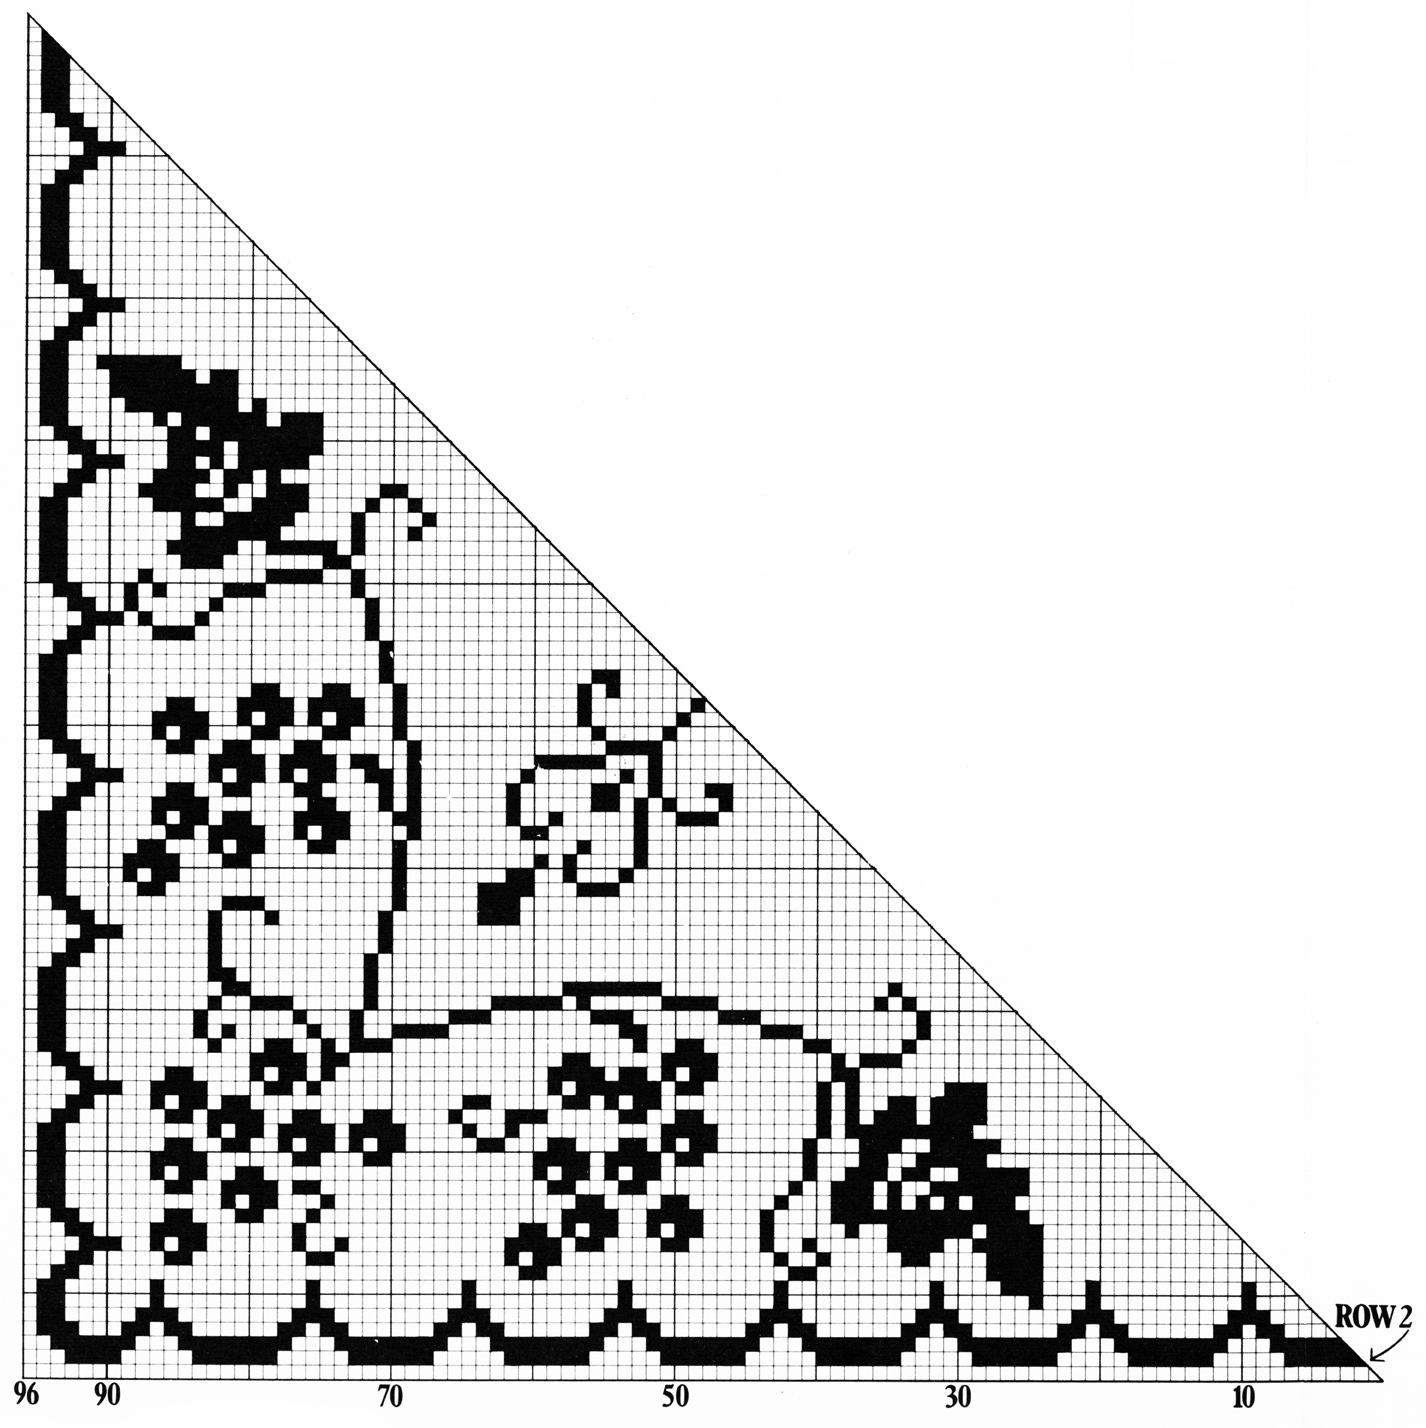
Fig. 2
Fringe: Following Basic Fringe Instructions, make double knot fringe. Each tassel contains 9 strands, each 24" long. Tie a tassel in every other sp of sides.
BASIC FRINGE INSTRUCTIONS
Cut a piece of cardboard about 6" wide and half as long as specified in instructions for finished strands. Wind yarn loosely around cardboard, cut across one end when card is filled. Cut a big pile of strands and then start fringing; you can wind more strands as you need them.
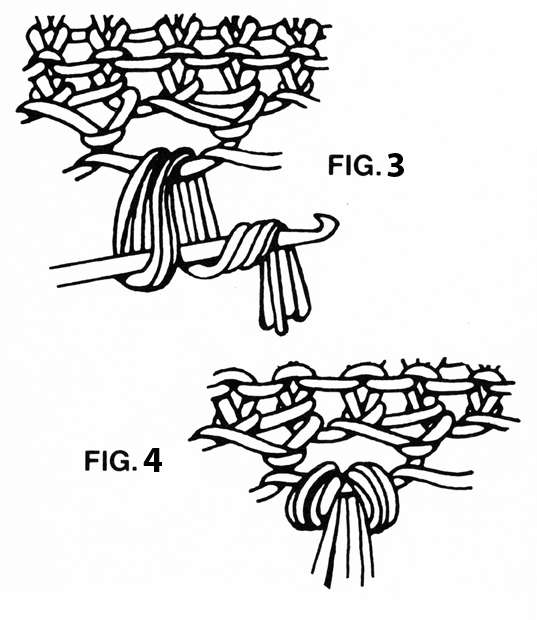
Fringe with wrong side of work facing you. For single knot fringe, put the number of strands specified for one tassel together and fold in half. With crochet hook (Fig. 3) draw folded end through space or st, pull loose ends through folded section and draw knot up tightly (Fig. 4) Repeat, spaced as specified in instructions. Trim ends to even off.

For double knot fringe, after completing fringe as specified above, turn so right side of work is facing you. Work knots as shown in Figs. 5 and 6 across.
Grapevine Filet Shawl by Jan Corbally is from Leisure Arts Leaflet #73, More Shawls to Knit & Crochet. We have made every effort to ensure that these instructions are accurate and complete. We cannot, however, be responsible for human error, typographical mistakes, or variations in individual work.
©2022 by Leisure Arts, Inc. All rights reserved. This digital publication is protected under federal copyright laws. Reproduction or distribution of this digital publication or any other Leisure Arts publication, including publications which are out of print, is prohibited unless specifically authorized. This includes, but is not limited to, any form of reproduction or distribution on or through the Internet, including posting, scanning, or e-mail transmission.
Recent Posts
-
")
How to Loom Knit MR. GNOME: Free Pattern (with video tutorials)
Say hello to Mr. Gnome! He is so cute and super easy to make! This is a great project for beginners. …Jun 8th 2023 -

Learn to Loom Knit with a Circular Loom
Loom knitting is a different version of regular knitting that’s created on a pegged loom instead of …Jun 2nd 2023 -

Learn to Punch Needle
Have you ever been curious about punch needle crafts? I have been for a while, so I took some time t …May 26th 2023